Shooting a "Poor-man's Process" Car Interior Scene

"Poor-man's Process"! This scene that I shot for Madam Secretary ep. 409 features a common alternative workflow to either a freedrive or a process trailer, involving a static car and compositing driving plates into greenscreen footage. First, the scene:

We set up the three-sided greenscreen box in the parking lot at the stage. The box is topped with a silk to allow the sun to light the greenscreens while we use various units to suggest ambience and sunlight entering the car itself. The lighting diagram is from memory; please forgive any inaccuracies:

My key light was a 10K through the front window half-topped with a silk to keep the faces softish while feeling harder light in the lower portion of the frame. (All of the following stills are uncorrected frame grabs with the shooting LUT applied.)

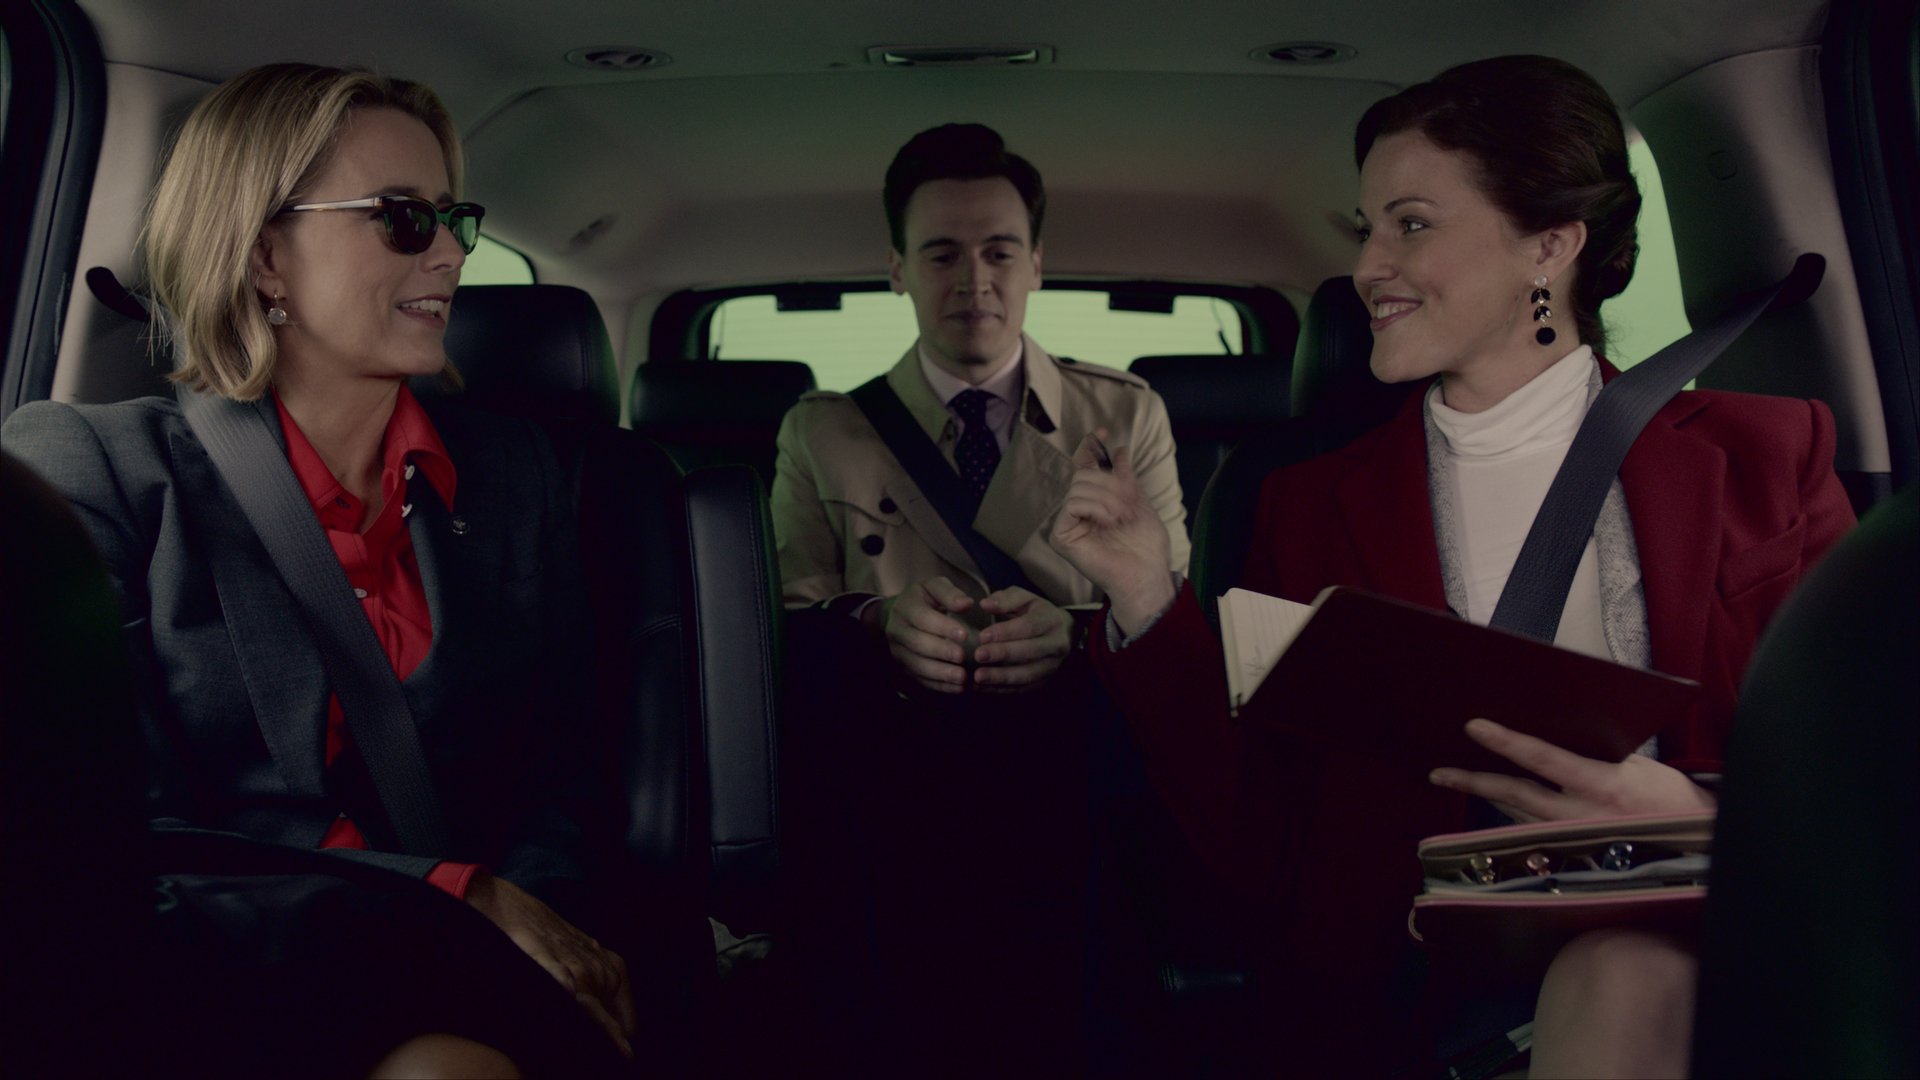
Erich Bergen in the back seat had his own special light through the side window which a grip would occasionally pass a solid through to feel some movement.

For the cross-coverage we brought in smaller, lightly-diffused units through the side which did double duty as edge lights and fill.

I shot the driving plates that were comped into the windows on a special trip to Washington D.C., as examined in detail in my previous post.
In the end is this cheaper than a process trailer day? Ask a UPM. It's certainly more controlled, which is nice.

Day Interior in a Windowless Basement

Indie filmmaking is entirely about doing a lot with a little. You’re not going to have the whole crew you need, the equipment package you want or the locations you’d prefer.

A scene in the forthcoming Walnuts The Movie was scripted as taking place in an attic space in the daytime, but unfortunately our single location (which was what made the movie possible and was very generously donated) didn’t have an attic. But it did have a basement. Without any windows.

If you can’t have daylight you need the idea of daylight, and an idea of daylight which fits the tone and mood of the story you’re telling. In this case we were already deep into surreality and psychological interiority by this point in the movie so it was much more important to produce an abstract feeling of daytime than to really sell the audience on the location being lit by a sunny (late afternoon sunny, in this case) exterior.

For the majority of the scene (looking this direction, there’s a relight for the reverse using the same gear arranged slightly differently) this came down to using two lights and a small number of modifiers.

The key light is an ARRI 2K tungsten fresnel fired into a large white bounce card (showcard, I believe, in this case), and the bounce source is cut with a single 18x24” solid. Then to create the light slash on the back wall I used an ARRI 300 tungsten fresnel and its barn doors, unmodified, to land the highlight exactly where it needed to be.

When we dropped back for Cat’s exit I added another bounce source powered by a dimmed ARRI 650 with 1/4 Straw gel clipped to the light in order to pick up her shadow side as she leaves the main area of action.

And that’s all there was to it! A lot with a little.

Many thanks to my gaffer Minu Park KSC and my grip Charlie Hager. Walnuts was directed by Jonas Ball and produced by Sarah Jo Dillon. The music in the above clip is by Tristan Chilvers.

The Resolution Question: Film vs. Digital

I was recently asked if Super 16mm film was capable of a higher resolution than 4K digital capture. Or, verbatim, the question was “also is 16mm a higher resolution than 4K [?]”. So, we have an opportunity to discuss the common confusion between raster and resolution.

Resolution is a measurement or a perception of how much discernible visual information appears in an image. It involves your entire imaging and display chain, not simply your capture medium. Resolution is measured in line pairs per millimeter.

The lens you're shooting with is capable of resolving a certain amount of information, your capture medium (sensor or film stock) is capable of resolving a certain amount of information, and your display or projection format is capable of resolving a certain amount of information. All of those things contribute to the 'resolution' of the viewed image.

'4K' is not a resolution, it is a raster size (meaning pixel or photosite dimensions, like 4096 x 2160, for example, or 1920 x 1080). It is extremely common both in camera (and display) marketing and in amateur cinematography circles to conflate the idea of raster with resolution. The two ideas are independent, and a given raster can “contain” a wildly varying amount of resolution.

If you were to compare lenses on the same capture medium (let's say the Alexa 65), you can produce very different resolutions at the same raster size. That is to say, both a very soft lens and a very sharp lens can be used when imaging to a 4K raster, but both the measured and the perceived resolution will be very different. Or, let's imagine you're shooting with a Master Prime, one of the measurably sharpest lenses available, and recording a 4K raster. What's your resolution when you throw the lens completely out of focus? It’s also common to use diffusion filtration to reduce the resolution of the system, usually for aesthetic reasons.

The perceived sharpness that a film stock is capable of rendering is described by a Modulation Transfer Function which plots how many line pairs per millimeter the stock is capable of discriminating at an acceptable level of contrast between the lines (i.e., can you actually distinguish between a black and white line, or is the image a gray mush?). 50% MTF tends to be the cutoff of acceptability. The MTF of film emulsion changes independently per dye layer, with the layers tending to diverge from each other between 10 and 20 lppm. The resolution of Kodak 500T at 50% MTF starts to decline steeply after 30-50 lppm, depending on the dye layer. Here is Kodak’s MTF chart for 5219/7219:

taken from https://www.kodak.com/content/products-brochures/Film/VISION3_5219_7219_Technical-data.pdf

taken from https://www.kodak.com/content/products-brochures/Film/VISION3_5219_7219_Technical-data.pdf

At 30 lppm each line is 1/60mm, or 16.7 micrometers, wide.

The Alexa's photosites are 8.25 micrometers in diameter, or roughly 1/125mm. At first glance this would seem to say that the Alexa sensor can resolve about twice the information as 500T film stock, but let's not forget our friend Nyquist, who tells us that we need to sample our information at double the highest frequency of that information, so this gets us back to being able to resolve lines about 1/60mm wide again. With the slight blur from the OLPF, the actual resolution at 50% MTF is probably roughly equivalent to 500T film negative, but in the sensor's favor that resolution should be roughly constant across the R, G and B-masked photosites, unlike the variable resolution of film's three dye layers.

But that's not all! We have to take into account the enlargement of the medium when displayed or projected. Why does 16mm film look both grainier and softer than 35mm of the same emulsion when projected? Because to fill the same size screen (or monitor), the 16mm film frame must be enlarged (blown up) much more than than the 35mm film frame. The same is true when scanning film; there's still a relative size difference between a 16mm film frame and the scanner's imager that's greater than that between a 35mm film frame and the scanner's imager. A similar effect happens if you're comparing 16mm film which has been scanned to a 4K raster vs. a digital image captured at a 4K raster from a Super-35 sized sensor. When viewed on the same display the 16mm film scan will appear softer and grainer than the digitally captured image (assuming a low amount of noise in the digital image).

So, to sum up, it is highly likely that a 4K-raster digitally captured image will be perceived to have a higher resolution than 16mm film scanned to a 4K raster.

The Relationship Between Focal Length and Format

The landscape of both cinematography and photography is littered with a wealth (or perhaps a glut) of choices in terms of “format”; the physical size of the imaging surface in the camera. You may be familiar with such diverse options as:

  • “Full Frame”

  • Super 35

  • APS-C

  • Micro 4/3

etc.

A tremendous amount of ambient confusion reigns regarding how differing focal lengths of lenses interact with format sizes to affect the field of view of the image. People use terms like “crop factor” to get a handle on how the expected field of view may differ between formats, but this often misleads novices into believing that one can simply use a lens “meant for” the format they’re shooting with (typically one of the smaller formats) and then they won’t have to consider the so-called crop factor and can get on with their lives.

The only way in which a lens can be “meant for” a particular format is if it has been engineered such that it projects a sufficiently large image circle across the imaging area to avoid vignetting (darkening of the sides and/or corners of the image). Focal length is a constant. A 50mm, for example, is always a 50mm, no matter what format it is projecting onto*. If we take Nikon’s naming conventions as an example, a 50mm lens sold for their DX (APS-C) system is only different from a 50mm sold for their FX (“full frame”) system in that the latter projects a larger image circle than the former.

“But!”, you may be tempted to respond, “if I put that 50mm FX lens on my DX body, I see a narrower field of view than I do on my FX body!” This is true, but it’s obvious that the lens hasn’t changed. What has changed is the area of the lens’ image circle which is being “sampled”, as it were, by the smaller-sized imager.

Consider this diagram, in which the 60mm-diameter image circle projected by the Leitz Thalia line of cinema lenses is overlaid on various common cinema formats:

lenscoverage_anno.jpg

What this illustrates is that as the format in question gets smaller, the angle of view produced by the combination of focal length and format size also gets smaller. It is clear that a Super 16mm-sized imager “sees” significantly less of the image circle than the Alexa 65’s does. Taking our Nikon example above, if you were to attach Nikon’s 50mm DX lens to an FX body, you would see the same angle of view as when you attach your FX 50mm but the image would be “portholed”; extremely heavily vignetted, like a Thalia is on a 15/70 IMAX frame.

So, whether a given lens is wide-angle or telephoto depends entirely on what size format it’s being paired with. Let’s presume the Thalia used in our diagram above has a focal length of 100mm. On a “full frame”** imager a 100mm lens produces a horizontal angle of view of 20.4°, which is fairly telephoto. When paired with the whole image area of the Alexa 65, however, a 100mm lens produces a 30.3° HAOV, which is more of a medium telephoto feel, much like what you would get if you mounted a 65mm lens on a “full frame” body.

That comparison I just made there is what people are getting at when they speak of “crop factor”. Where crop factor is practically useful is when one wishes to match angle of view across different formats. If I were shooting a scene with both an Alexa 65 and another Alexa with a Super-35 sized imager, and I wished to match HAOV on both cameras, it’s useful to know that the lens I use on my Super-35 body should have a focal length 0.46x that of the one I use on my Alexa 65.


*Focal length is the distance from the rear nodal point of the lens to the imaging plane when the lens is focused to infinity. The greater the focal length, the more magnification of the image projected on the image plane.

**I keep putting that in quotes because calling it “full frame” when one’s frame can be much more “full” seems silly, but we don’t have a better name unless we want to say “35mm stills” or “8-perf 35mm”.

Scene Breakdown: Madam Secretary ep. 507

This scene I shot as 2nd unit DP for episode 507 of the CBS series Madam Secretary serves as a decent illustration of what goes into a simple day exterior photographed with available light, so I thought I would walk through it briefly.

The master setup, establishing the scene’s geography, the relationships between characters, and the color palette in one image. On the tech scout our series DP Learan Kahanov noted that the sun rose over the stands in the background so we planned our day to begin looking in that direction to provide a striking edge light and deep shadows to outline our subjects. This was shot at a T4/5.6 on the wider end of a Fujinon 25-300 zoom lens, which was the only lens we were budgeted to carry for the day (times 2, as we had two cameras for the scene), with a filter pack of a Formatt Firecrest True ND 1.8 to control exposure plus a soft-edge grad ND .6 to provide a little “Days of Thunder” feel from the top left corner of the frame. VFX would eventually change the signage above the characters.

507_724_1.3.1.jpg

Tighter coverage looking the same direction. Same ND, no grad. James is “keyed” by the bounce off the dragstrip he’s standing on from the intense sun over his left shoulder. For the color of the scene, I wanted the skintones to seem healthyish but the overall feel to have a kind of kerosene-polluted warmth; more red/magenta than I would normally go, to be evocative of a racetrack ambience.

507_724_1.9.1.jpg

For the reverse coverage of Erich, I didn’t want the harsh direct sun on his face if I could help it. For the tighter shots we pulled out the major piece of grip gear for the day: a 12x20 light grid diffusion frame. In the final version I asked the colorist to stretch the highlights a bit on both Erich and the background so the contrast shift wouldn’t feel so extreme when cutting back and forth between James and Erich.

Here’s a little behind-the-scenes shot of what it looked like to fly that 20x:

58057.jpeg

However, we had a problem in the wider shots of Erich.

507_724_1.4.1.jpg

One thing I did not know about the front windshield of a stock car is that it is raked backward at a very shallow angle, but we discovered while blocking a dolly move which revealed Blake that it was impossible to both cover Erich with the frame and keep its reflection out of the car. Another thing I learned is that the windows are polycarbonate, which made using our polarizing filter to attenuate the reflection impossible because of the rainbow moire interference patterns created when the filter was introduced. We minimized it as much as possible, but then got lucky to have a thin cloud layer roll in while we still had time to go back and reshoot the wider shot without the frame.

507_724_1.11.1.jpg

We didn’t get to the coverage of Usuki’s Assistant until that cloud layer had settled in, so in this setup I miss a bright back/edge light I’d otherwise want to be there to match what was established in the master. If this were a main unit scene with the electric truck available I might have asked for the gaffer to recreate that hot backlight, but alas.